Installation
Installation prerequisites
Important: Windbird calibration
It is mandatory to calibrate the Windbird before installing it.
Windbird calibration process is described on this page in the paragraph: "Calibrating the Windbird".
Unpacking
The Windbird box contains 4 items:
- Windbird anemometer
- USB computer update cable
- A bag containing a bracket and screws for mounting the instrument
- A document to guide you through Windbird commissioning
The Windbird has been packaged in a cardboard box for transport, which should be disposed of in the recycling bin.
The product has been protected by bubble wrap to prevent breakage, and should be disposed of in the waste bin.
The Windbird contains a battery which should not be disposed of in the waste bin, but in a recycling bin dedicated to batteries.
Serial number record
Each Windbird has a unique serial number. This number is marked on the tail.
The serial number is the "identity" of your Windbird. It is important to record this number and write it down on a piece of paper for safekeeping.
This number allows you to quickly access wind measurements on the OpenWindMap website, renew your Sigfox subscription or contact customer service for technical support.
Location choice
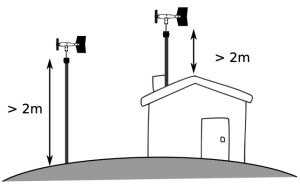
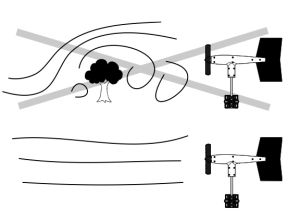
Obstacles such as trees or buildings create turbulences which interferes with wind measurement. Make sure the Windbird has an unobstructed view.
Place the Windbird away from obstacles to improve radio transmission of wind measurements.
Make sure the Windbird has a complete 360-degree clearance to ensure reliable wind measurements in all directions.
Pole choice
The Windbird must be at least 2 metres above the ground or roof on which it is installed. The higher the Windbird be placed, the less obstacles will interfere with the measurement. Radio transmission of wind measurements is improved when the Windbird is placed high up.
As a guide, here are the heights generally used:
- Meteorology: 10m above ground level
- Aviation: 10m above ground level
- Agriculture: 2m above ground level (for evapotranspiration calculations)
For "leisure" use, a 4.60m "windsurfing" mast is usually sufficient.
An 8m wooden, galvanized steel or composite pole is a very good choice for installing a Windbird (ex telephone pole).
Fastening
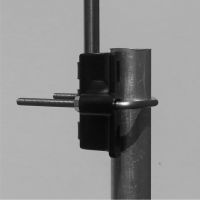
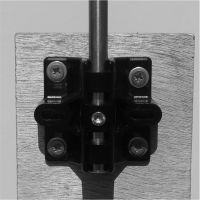
The Windbird can be mounted on a bracket in a number of ways:
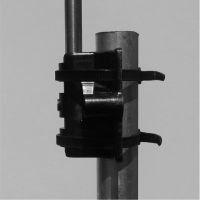
- With a bracket
- With plastic clamps
- With screws and washers
It's important to choose the right mounting system beforehand.
The mounting bracket must be adapted to the fastening system: a tube is preferable for bracket or plastic clamp fastening.
For screw fastening system, a resistant material should be used as the fastening support, with screws and washers of the appropriate size. Where a hole has to be drilled in the fastening support, plugs must be used, and their diameter must be carefully selected according to the material.
It's important to use the correct torque for any fastening system, to ensure that the Windbird is held securely without damaging the plastic fastener.
Le Windbird peut être fixé de différentes manières sur un support :
- Avec un étrier
- Avec des colliers plastiques
- Avec des vis et des rondelles
Il est important de bien choisir au préalable le système de fixation qui sera adapté à son installation.
Le support de fixation doit être adapté au système de fixation, un tube doit être privilégié pour les fixations par étrier ou par colliers.
Concernant le système de fixation par vis, un matériau résistant devra être utilisé comme support de fixation avec des vis et des rondelles de taille adaptée. Lorsqu'un percement du support de fixation est effectué, des chevilles devront être utilisées et le diamètre de celles ci devra être choisi avec rigueur en fonction du matériau.
Il est important d'appliquer un serrage adapté quelque soit le système de fixation utilisé pour assurer un maintien solide du Windbird sans endommager la pièce en plastique de fixation.
Fonctionnement
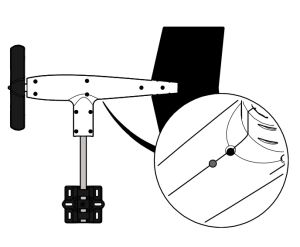
Bouton de commande multi-usages
Un unique bouton est présent sur le Windbird, il permet de démarrer, d'arrêter ou de calibrer le Windbird.
Le bouton multi usages se situe sous l'appareil. Il peut être utilisé en effectuant un appui à l'aide d'une pointe de stylo.
La durée d'appui sur le bouton multi usage déterminera l'action qui sera réalisée:
- Appui bref sur le bouton -> Démarrage ou Arrêt du Windbird
- Appui de 10 seconde sur le bouton -> Lancement de la calibration
Une lampe LED est placée à côté du bouton et elle clignote en fonction de l'état du Windbird
Calibration de la girouette
Lors de la première utilisation, ou si vous constatez que le Windbird vous donne une direction erronée, il est nécessaire de calibrer la girouette.
- Allumez le Windbird
- Restez appuyé sur le bouton, jusqu'à ce que la LED se mette à clignoter rapidement (environ 10 secondes).
- La LED clignote pendant 5 secondes, pour vous laisser le temps de vous préparer avant la calibration.
- Lorsque la LED devient fixe, la calibration commence. Faites tourner Windbird autour de son axe, jusqu'à ce que la LED s'éteigne (environ 15 secondes). L'objectif est de faire au moins 3 tours. Pour que la girouette fonctionne correctement, l'axe de Windbird doit toujours être le plus vertical possible pendant toute la durée de la calibration. La girouette fonctionne à l'aide d'une boussole. Il se peut qu'elle soit perturbée si elle est exposée à de forts champs magnétiques (à proximité d'une ligne électrique ou d'une antenne relais).
Démarrage
• Pressez brièvement le bouton. La LED s'éclaire fixement pendant quelques secondes pour confirmer le démarrage de l'appareil.
Environ 10 secondes après, votre Windbird devrait apparaître « en ligne » sur le site internet ou l'application mobile (voir le chapitre « Consultation des mesures »).
Les premières mesures ainsi que la position seront transmises une quinzaine de minutes après l'allumage. Cela peut parfois prendre un petit peu plus de temps si la réception GPS n'est pas bonne.
Il se peut que la LED s'allume bien, mais que le Windbird n'apparaisse pas en ligne, même après 30 secondes. Cela signifie que le Windbird ne capte pas le réseau Sigfox dans cette zone. Ressayez à un autre endroit.
Arrêt
• Lorsque votre Windbird est allumé, appuyez brièvement sur le bouton. La LED clignotera 5 fois pour signifier l’arrêt de l'appareil.
Environ 10 secondes après l’arrêt, le Windbird devrait apparaître « hors ligne » sur le site internet ou l'application mobile.
Maintenance
Pile
Le Windbird contient une pile haute performance pouvant résister aux conditions extrêmes de température.
L'autonomie est d'environ 4 ans. De nombreux paramètres peuvent faire varier cette durée.
Roulements
Les roulements du Windbird ne nécessitent pas d'entretien, ils sont conçus pour fonctionner à sec. N'ajoutez pas de l'huile ou de la graisse, vous risquez de perturber les mesures.
Il est néanmoins recommandé de remplacer les roulements en même temps que la pile pour maintenir un haut niveau de performance dans les mesures de vent.
The Windbird's bearings are maintenance-free and designed to run dry. Do not add oil or grease, as this may interfere with measurements.
It is nevertheless recommended to replace the bearings at the same time as the battery to maintain a high level of performance in wind measurements.
Sigfox network
Your Windbird automatically connects to the Internet via the Sigfox radio network. There are no settings to make. Subscription is included for the first year, and can be renewed on the OpenWindMap website.
This network offers similar coverage to GSM. Windbird can therefore operate reliably. However, some areas may not be covered.
There are no borders: a Windbird purchased in France will automatically work in Spain or the Netherlands. The reverse also works.
Spare parts
Des pièces détachées sont disponibles pour réparer chaque élément du Windbird en cas de casse ou d'endommagement.
La pile du Windbird devra être achetée tous les 4 ans environ pour effectuer son remplacement avant qu'elle ne soit totalement déchargée.
Spare parts are available to repair each Windbird component in the event of breakage or damage.
The Windbird battery should be purchased about every 4 years, and replaced before reaching the maximum discharge level.
Technical details
Geolocation
Windbird is equipped with a GPS chip to update its position on the map.
The location functionality is activated automatically :
- on power-up, for a maximum of 15 minutes
- once every 4 days, for a maximum of 1 minute.
To work properly, the GPS needs a clear view of the sky. It can sometimes fail if your Windbird is at the bottom of a deep valley, close to trees, too close to a building, or in bad weather.
Transmissions des mesures
Windbird measures wind direction and speed during two 5-minute periods. Measurements are transmitted to the Internet every 10 minutes.